The Bluetooth Remote Control
By limpkin on Thursday, July 3 2008, 11:29 - My Projects - Permalink
Hello everyone!
This time I'll present you a project that I'm particularly proud of. Well, this is a bluetooth remote control for winamp. But it is not everything that it does, as you will see...
Well, let me explain you why I had this idea. Everytime I'm moving around my appartment, there are always things that I would like to do remotely when I'm listening to my music: change the volume, see what track is being played, move to the next track, and why not, stop the music and make a skype call using the remote.
This is the concept, if you haven't understood it let's put it another way:
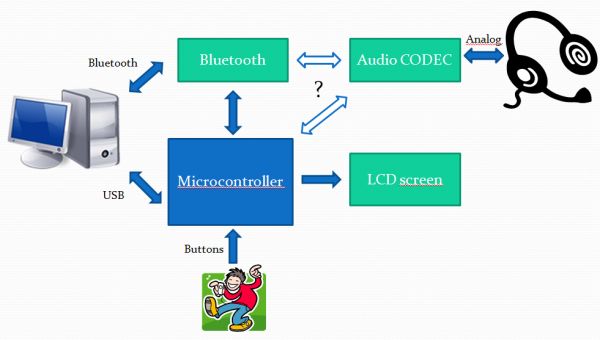
As you can see on the picture, the microcontroller is connected to the computer using an USB link. This link will be used to charge the Li-Ion battery of the remote, reprogram the microcontroller using the provided bootloader. And since we have a USB connection, why not make the remote be recognized as an external multimedia keyboard? Why? So if you don't have a bluetooth adapter on your computer, you can still change songs when connected through USB ;).
A few words about the choice of components. For the uC, I chose an AT90USB1287 from Atmel, which will be running at 8Mhz, has 128kb of flash memory (used to store the LCD graphics), has an embedded USB bootloader, and whose compiler is free (WinAVR). For the Bluetooth chip, it was the LMX9838 which was pretty hard to get when I did this project, it is a Bluetooth to UART controller with embedded antenna. It can also control an audio codec, that's why I chose the Winbod W681310 which was one of the supported. Finally, for the LCD screen, I found a nokia 130*130 color LCD bought on sparkfun.
Thus, this is the new concept picture with the components:
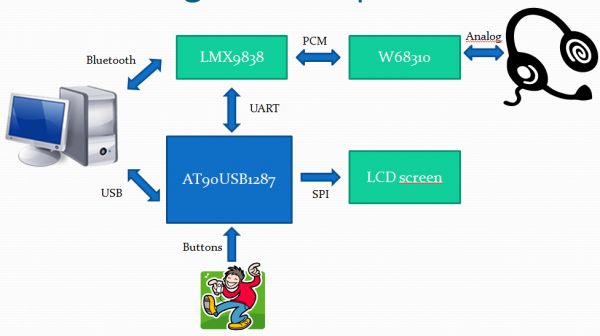
On the picture you will see the different protocols used between the components. The packets sent to the Nokia LCD through the SPI bus are 9bits long and since the SPI bus controller of the AVR only handles 8bits packets, I had to generate the first bit by hand (command / data bit). The PCM communication between the LMX and the codec is completely handled by the BT chip, no need to worry. For the USB communication, that was a bit more complex to do since you have to send all the appropriate USB descriptors that the PC requests (interesting link here). Implementing a HID peripheral device was not that hard, however when you create a device having 2 HID descriptors (one for the multimedia keys and one for the arrows...), Windows recognizes it as a composite device and thus must have the appropriate driver to install it (wonderful huh?), the solution was to copy the HID descriptors, the vendor ID & product ID of an old multimedia keyboard I found.
Now let's have a look on our global project architecture from a layer point of view:
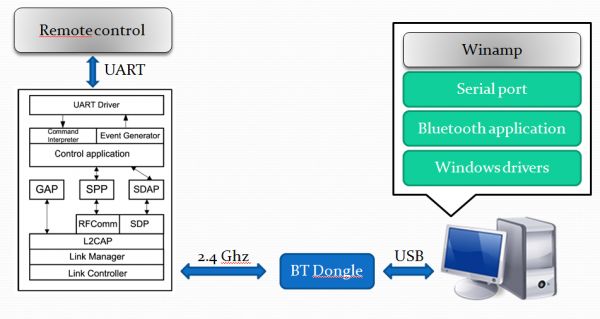
Here you can see what are the different layers used for the remote to work. I implemented a protocol to know which tracks are being played and to give orders to winamp, which is using a serial port over bluetooth. On the windows side it is very easy to use, you just have to write data into a port you opened, using normal C / C++ functions. On the other side, the LMX just output the data it received so the microcontroller has just to parse it. As usual, all the details / files are given at the end of this article. Here is a brief overview of the protocol (the packet fields are detailed in the source code):
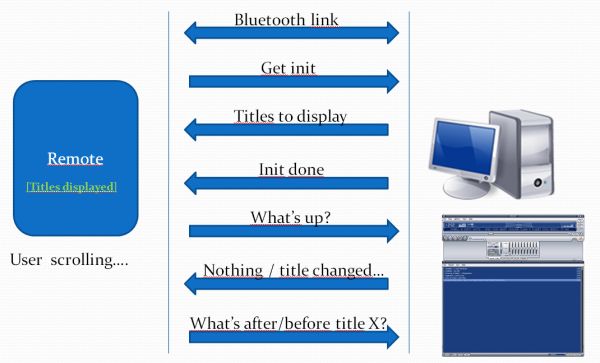
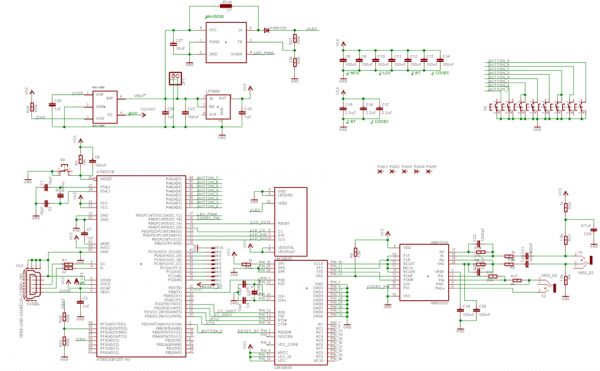
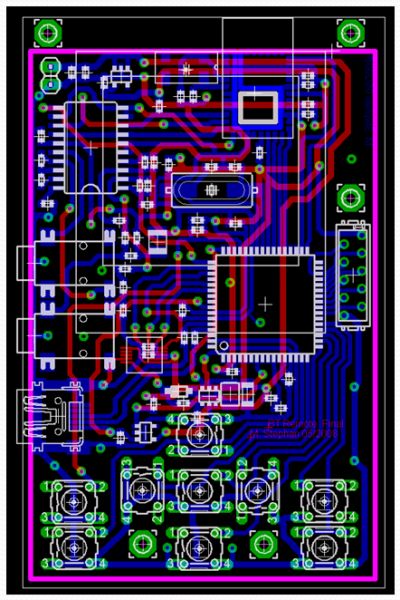
Well, until now you just have seen general pictures, but nothing concrete I know... So let me show you the schematics and the PCB:
You'll notice that the board could be smaller. Why didn't I make it smaller? Because with this version you can produce it yourself, no need for big machines ;). Since a remote wouldn't be a remote without a packaging, let's design a small box:
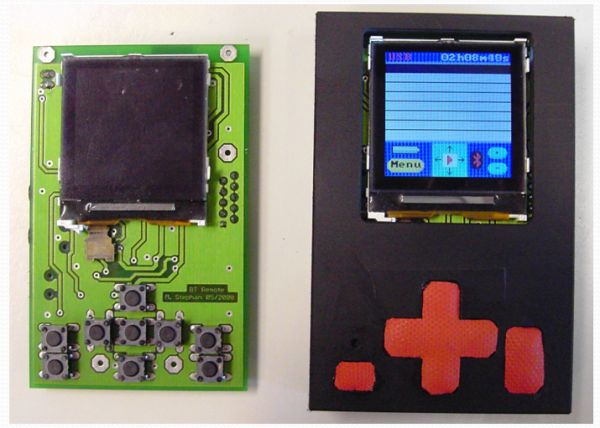
Finally, let's produce the board & the box (yes, I can hear you say.... of course the first try wasn't completely successful, but here is the final result ;)):
Nice isn't it? Here is the picture of the remote communicating with winamp:
Yes, it displays the playing progression and you can browse through the winamp playlist. A button enables you to switch between player / menu mode where you can enable / disable several functions (power saving, USB keyboard...). Concerning the audio functionality, when pairing the remote, a headset profile is available on the remote. Thus, the remote can be used to make calls through skype or any voip software. It is worth mentionning that the winamp plugin I created will be also declared as a Skype plugin but because of the time I had left, I couldn't implement all the function calls to check if there was an incoming call / to call someone etc... (but however it is possible to do so when you see the plugin source code, you just have to communicate with the Skype API and add some new messages to the remote...)
Some final words about this project. I was really happy that in 3 months, working approx 16 hours a week I was able to create a project that was interfaced to a computer on such a high level (USB & BT). I've now a fully operational remote control for winamp that I can also use as a headset (2 jacks are on the board).
Here are all the files used / created for this project. PS: You'll see that the remote control source code is fully documented using doxygen and all the reports are in english ;)
Bluetooth Remote Code Bluetooth Remote Schematics And Board Bluetooth Remote Final Presentation Bluetooth Remote Final Report (EN) Bluetooth Remote List Of Components Bluetooth Remote Datasheets BTP_Project_Utils.rar BTP_Winamp_Plugin.rar


Comments
the packet fields are detailed in the source code ! précision importanyte pour la compréhension ;)) merci pour ce billet, c'est toujours un plaisir de vouq lire, ye bye
Merci beaucoup pour votre commentaire, ca fait plaisir de savoir que ce site sert à quelque chose :)
Salut
Merci 1000x pour ton information sur les galvo, pid, etc!!!
Sylvain
Salut Sylvain,
De rien, c'est le but du site web. Si jamais tu as des questions sur ce qu'on a fait, n'hésite pas!
Resources like the one you mentioned here will be very useful to me. I will post a link to this page on my blog. I am sure my visitors will find that very useful.
Hey, Great work!
You need to consider two things tho.
1. your parts list is missing http://www.sparkfun.com/commerce/pr...
2. If someone was to etch this board at home, you need to find a way to insulate the traces under the LCD connector to prevent the traces shorting out with the connector as there is no solder resist.
Cheers
Roman
Hey Roman and thanks for the compliment.
1. You are right, sorry :)
2. Yeah, i think the most difficult part of the producing stage is to solder this connector. Depending on how you manufacture the pcb, manufacturers may or may not be able to put solder resist between the pads. But once it is soldered, you don't have to worry about it anymore!
limpkin
Sérieux c malade =P Vous avez un produit commercial. Regarder pour soit un brevet ou bien une compagnie qui pourrait produire ca en quantité. Je connais plein de monde avec des HTPC et ca la vraiment un grand potentiel commercial.
Bonne chance
Elnono
Merci pour tes commentaires elnono! C'est vrai que cela pourrait avoir beaucoup de potentiel... mais d'après mon expérience lancer une production en quantité d'un tel produit n'est pas chose aisée... il faut qu'il y ai un vrai potentiel commercial derrière, ce qui n'est pas garanti dans ce cas! Surtout que maintenant tu peux voir beaucoup de télécommandes avec un meilleur écran que celui ci, avec un meilleur aspect graphique...
Hey Bademeister!
I got the at90usb from farnell.com, the lmx9838 from a national semiconductor distributor in Switzerland, and for the W681310 I don't remember.
Anyway I'm going to have a look if I can find some of the samples I obtained 2 years ago and thus I might be able to send them to you! I'm going to send you an email in a couple of minutes...
hi,
im thinking of build a device like this.. but i cant figure out how the remote device establish the connection with PC. and how PC recognize which button user press... could you please enplane me how those things happens in your project.
thanks
Hey!
The PC initiates the connection with the BT device, everything is handled by both components so you don't have to worry about it. For the buttons, well I'm just sending chars to the PC using the serial port implemented by the BT connection :).
Hai,
I am working on RZUSBSTICK ,and developed firmware for USB and now I have stucked with the concept of establishing a communicatiion between PC and USBstick.Can you please give me the idea.
thanks in advance
Hey Ramya!
Well, it depends what kind of communication you want to implement...
Can you tell me more?
you can contact me by email if you want.
Hi,
I am rebuilding this project for fun and I was wondering how you went about programming the AT90USB. I have all my parts and the PCB ready to go and am about to start construction. Do you flash the micro before soldering it onto the board, or does the board design allow for programming the micro after the board has been constructed via USB?
Thanks!
@Eric Schneider : Hey Eric! I used the Atmel Flip utility :). You can reprogram the at90usb whenever you want to!
Thank you so much! As I said, I am actively devloping this project of yours so I might have more questions later.
@Eric Schneider : you are welcome! you can contact me by email if you want ;)
hi,
i want to make bluetooth presenter and it doesn't have lcd screen.it just use for change page in powerpoint and increase or decrease volume.
so can u help me to choose correct avr !
Mojtaba : The one I used will be perfect for you!
okay thank u!
but there is question what programmer do use for programming the avr?
For this uC, you can use the already present bootloader in the AVR. You'll only need your usb cable to program it, with atmel flip software.